 how-to
How to Replace a Gas Dryer Igniter Safely
Table of Contents
- Gas Dryer Igniter Symptoms: Is Yours Actually Failing?
- Safety Precautions Before You Start
- Tools and Materials You'll Need for Gas Dryer Igniter Replacement
- How to Test a Gas Dryer Igniter Before Replacing It
- Step-by-Step Igniter Replacement Process
- How Long to Replace a Dryer Igniter and What to Expect
- Testing Your Work and Troubleshooting Common Issues
- When to Stop and Call a Professional
- Frequently Asked Questions
Last Updated: October 11, 2026
Gas Dryer Igniter Symptoms: Is Yours Actually Failing?
Your dryer runs, but no heat. The drum spins. Nothing else happens. Before you call for service or buy a replacement part, you need to confirm the gas dryer igniter is actually the problem. Many homeowners replace the wrong component and waste time and money.
A clogged vent, broken thermal fuse, or faulty thermostat can cause identical symptoms. Testing the igniter before replacement saves you from unnecessary parts purchases.
Safety Precautions Before You Start
Do not touch anything inside your dryer until you've completed these safety steps. Gas dryers carry real hazards: electrical shock, gas leaks, and burns from hot components.
Unplugging the Dryer and Shutting Off the Gas
Unplug the dryer from the electrical outlet first to remove power and prevent shock. Next, shut off the gas supply by locating the gas line connection behind the dryer and turning the valve clockwise until it stops, the valve handle should point perpendicular to the gas line when closed. Do not rely on the dryer's power switch; internal components remain live even when off.
Checking for Gas Leaks
After shutting off the gas, check for leaks using soapy water. Mix dish soap with water in a spray bottle and spray the gas connection point and all visible joints. Bubbles mean gas is escaping, call a professional immediately. If no bubbles appear, the connection is secure and you can continue.
Tools and Materials You'll Need for Gas Dryer Igniter Replacement
Gather these items before you start:
- Replacement gas dryer igniter (correct model number for your dryer)
- Phillips head screwdriver
- Flathead screwdriver
- Needle-nose pliers
- Multimeter (optional, for testing the old igniter)
- Flashlight or headlamp
- Work gloves
- Small container for screws
Check your dryer's model number on the nameplate inside the door frame or on the back of the unit before ordering the replacement part.
How to Test a Gas Dryer Igniter Before Replacing It
Testing confirms the igniter is actually broken and rules out other common causes of no-heat symptoms, preventing unnecessary replacement.
Step 1: Rule Out a Blown Thermal Fuse
The thermal fuse sits in the vent duct and blows if the dryer overheats, producing identical symptoms to a failed igniter: the drum spins but no heat appears. Locate it near the blower wheel, it's a small cylindrical component, usually white or tan, about 1 inch long. Disconnect it and test with your multimeter set to ohms. A working thermal fuse shows continuity (zero or near-zero ohms); an infinite reading means it has blown and must be replaced, not the igniter.
Step 2: Check for a Clogged Vent
A blocked vent duct causes the dryer to overheat and shut down the heating cycle, one of the most common causes of no-heat complaints. Disconnect the vent hose from the back of the dryer and hold a tissue near the vent opening while the dryer runs on air-dry mode. If the tissue barely moves, lint has clogged the vent. Clean the vent duct with a vent brush or shop vacuum, removing lint from the hose, duct path, and exterior vent cap.
Step 3: Test the Igniter with a Multimeter
Set your multimeter to the ohms (resistance) setting and unplug the dryer completely. Locate the igniter inside the burner assembly, a small ceramic rod with wire connectors attached, usually 2-3 inches long. Disconnect the wire connectors by gently pulling them straight off, then touch the multimeter probes to the igniter terminals. A working igniter shows between 40 and 90 ohms of resistance. If the reading is zero ohms (short circuit) or infinite ohms (open circuit), the igniter has failed.
Step-by-Step Igniter Replacement Process
Accessing the Burner Assembly and Igniter Location
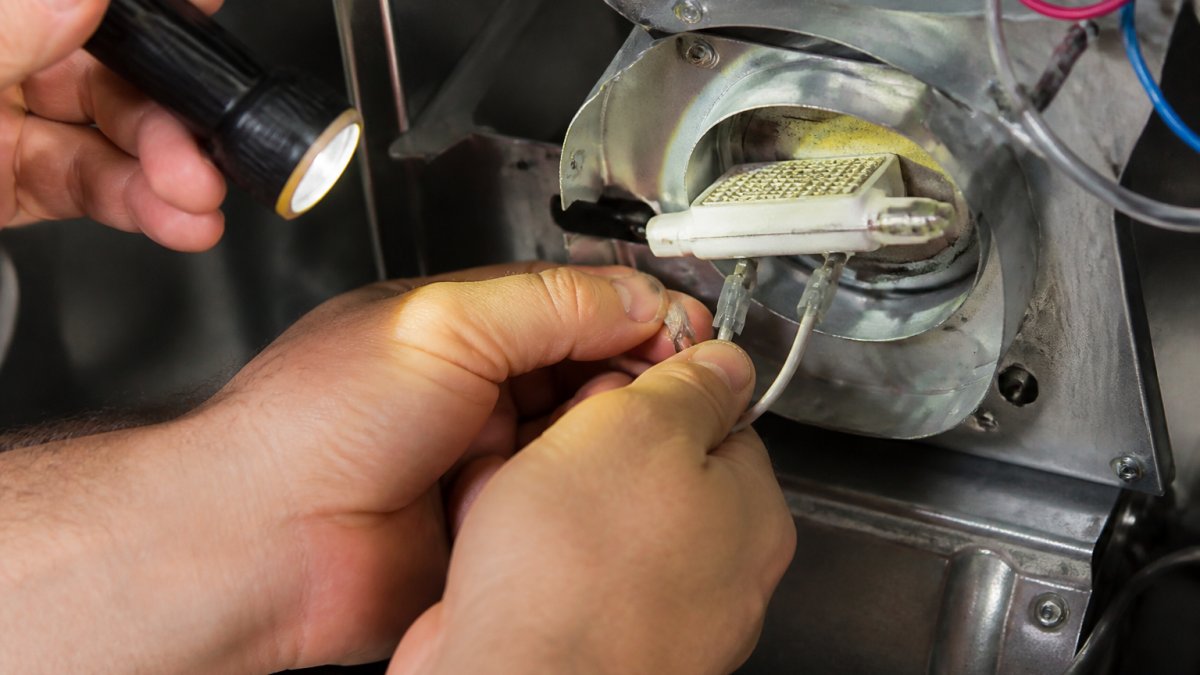
Open the dryer cabinet by removing the three to five Phillips head screws holding the front panel in place. Gently pull the front panel away from the cabinet without forcing it. Inside, you'll see the drum and burner assembly beneath it. The igniter sits inside the burner assembly, a small ceramic element, roughly 2-3 inches long, with two wire connectors.
Removing the Old Igniter
Disconnect the wire connectors by gently pulling them straight off without twisting or bending them. Locate the igniter mounting bracket and remove the one or two screws holding it in place. Carefully pull the igniter straight out of the burner assembly, the ceramic element is fragile and rough handling breaks it.
Installing the New Igniter
Insert the new igniter into the burner assembly, align it with the mounting holes, and install the mounting screws hand-tight. Reconnect the wire connectors by pushing them firmly onto the igniter terminals until they seat, loose connections prevent ignition. Reassemble the front panel by reversing your removal steps.
How Long to Replace a Dryer Igniter and What to Expect
The actual replacement takes 30-45 minutes for someone with basic mechanical skills.
| Phase | Time | Notes |
|---|---|---|
| Preparation & safety checks | 10 minutes | Unplug, shut off gas, check for leaks |
| Opening the cabinet | 5 minutes | Remove front panel screws carefully |
| Disconnecting old igniter | 5 minutes | Note wire connector positions |
| Installing new igniter | 10 minutes | Align mounting, reconnect wires firmly |
| Reassembly | 10 minutes | Reinstall panel and all screws |
| Testing | 5 minutes | Run test cycle to confirm heat |
The first time takes longer. Familiarity with your specific dryer model speeds up future repairs.
Testing Your Work and Troubleshooting Common Issues
Plug the dryer back in. Turn the gas supply valve counterclockwise to reopen the line. Wait 30 seconds for gas to reach the burner assembly, then run a test cycle on high heat with no clothes inside.
What to Expect During a Successful Test
Listen during the first 10 seconds for rapid clicking or ticking, the igniter sparking. The clicking should stop within 10-15 seconds as the burner ignites, the burner assembly should glow orange or yellow, and warm air should flow from the vent opening after 30 seconds. If all three occur, the replacement was successful.
Troubleshooting: Continued Clicking Without Ignition
If you hear persistent clicking but the burner does not glow and no heat appears, the most common cause is a loose wire connector. Unplug the dryer immediately, continued clicking without ignition means gas is flowing but not igniting, creating a fire or explosion hazard. Open the cabinet and locate the igniter wire connectors. Disconnect both and inspect the terminals for corrosion, bent pins, or damage. If clean, reconnect the wires firmly until they seat completely.
Troubleshooting: Defective Replacement Igniter
If the burner still does not light after reseating the connectors, the replacement igniter may be defective.
Unplug the dryer. Disconnect the igniter connectors again. Set your multimeter to ohms and test the new igniter's resistance. If the reading is outside the normal 40-90 ohm range, the replacement part has failed.
Contact the supplier or manufacturer for a warranty replacement. Most igniter suppliers offer 30-day returns for defective parts. Provide your dryer's model number and the part number of the failed igniter.
Troubleshooting: Burner Lights But Dryer Does Not Heat
If the burner ignites (you see the orange glow) but warm air does not flow from the vent, the igniter replacement was successful but another component is preventing heat circulation.
Check the following:
- Vent blockage: Even a partially clogged vent can prevent heat from reaching the drum. Clean the vent duct, hose, and exterior cap again.
- Blower wheel: If the blower wheel is clogged with lint, air cannot circulate. Remove the blower wheel and clean it thoroughly.
- Thermostat: The thermostat may be faulty and shutting off the burner prematurely. This requires professional diagnosis and replacement.
- Gas valve: If gas is not flowing to the burner at full pressure, the igniter will spark but the flame may be too weak to heat the drum. A faulty gas valve requires professional service.
If the burner ignites reliably but heat still does not appear after cleaning the vent and blower, call a professional. The issue is beyond igniter replacement.
Checking for Gas Leaks After Reassembly
Before declaring the repair complete, verify that no gas is leaking from the reconnected gas line or burner assembly.
Mix dish soap with water in a spray bottle. Spray the gas connection point behind the dryer and all visible joints in the gas line. Also spray around the burner assembly where the gas enters. Bubbles indicate a gas leak, do not use the dryer. Call a professional immediately.
If no bubbles appear, the gas connections are secure and the repair is complete.
When to Stop and Call a Professional
Some situations require professional service. Stop and call if you encounter these issues:
- Gas smell during or after the repair
- Visible cracks or damage inside the burner assembly
- Wire connectors that are corroded or damaged beyond reconnection
- Mounting brackets that are bent or broken
- Continued clicking and no ignition after reconnecting wires
- Any sign of a gas leak during the shutoff or testing phase
Professional technicians have specialized tools and diagnostic equipment. They can identify problems you might miss and handle complex repairs safely. Home Tech serves the Phoenix metro area with same-day appointments and EPA 608-certified technicians.
Replacing a gas dryer igniter is straightforward when you follow safety steps and handle the fragile ceramic element carefully. Most homeowners complete the job in under an hour. But if you're uncertain about any step, especially gas safety, calling a professional is the right choice.
Frequently Asked Questions
How do you know if a gas dryer igniter is bad?
A failing igniter shows clear signs: the dryer runs but produces no heat, the burner won't ignite, or you hear clicking sounds without flame. You may also notice clothes staying damp or cold after a full cycle. The ceramic element may appear cracked or discolored. If your dryer is running but not heating, the igniter is often the culprit, though a faulty igniter sensor or gas valve can cause similar symptoms. Testing with a multimeter confirms whether the igniter has continuity before you replace it.
Can you replace a gas dryer igniter yourself?
Yes, if you're comfortable working with gas appliances and follow safety steps carefully. The replacement itself is straightforward: unplug the dryer, shut off the gas supply, access the burner assembly, disconnect the old igniter, and install the new one. However, if you smell gas during the process, cannot locate the shutoff valve, or feel uncertain about gas safety, stop and call a professional. Model compatibility matters, verify your replacement part matches your exact dryer model before starting.
What tools do you need to replace a gas dryer igniter?
Basic tools include a Phillips screwdriver, a multimeter (to test the old igniter), needle-nose pliers, and a flashlight. You'll need your dryer's model number to order the correct replacement igniter kit, which usually includes the igniter and wire connectors. Some models require a socket wrench or hex key to remove the front or rear panel. Have a bowl of soapy water on hand to check for gas leaks after reassembly. Safety equipment, work gloves and eye protection, is recommended when handling the fragile ceramic element.
How long does it take to replace a gas dryer igniter?
For someone with basic DIY experience, replacement typically takes 30 to 60 minutes from start to finish. This includes unplugging the dryer, shutting off gas, removing the front or rear panel, disconnecting the old igniter, installing the new one, reassembling, and testing. If you're unfamiliar with your dryer's layout or encounter stuck screws, plan for 90 minutes. Testing for gas leaks and verifying the burner ignites properly adds another 10 to 15 minutes. Professional technicians usually complete the job in under 30 minutes because they work on these units regularly.


