 how-to
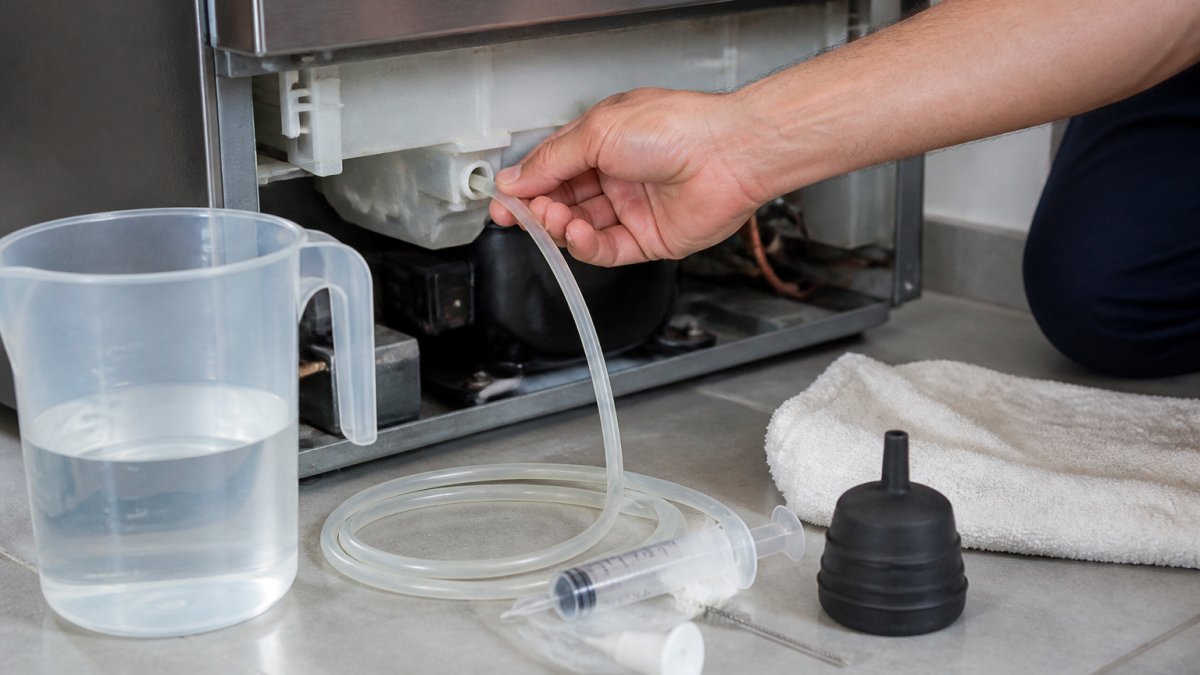
Best Tools for Unclogging Refrigerator Drain Lines
Table of Contents
- Why Your Refrigerator Drain Line Gets Clogged
- Signs of a Clogged Fridge Drain
- Essential Tools for Unclogging Refrigerator Drain Lines
- Refrigerator Drain Hole Cleaning Kit Options
- Step-by-Step Unclogging Procedure
- Refrigerator Drain Line Maintenance to Prevent Future Clogs
- When to Call a Professional Technician
- Conclusion
- Frequently Asked Questions
Last Updated: October 3, 2026
Why Your Refrigerator Drain Line Gets Clogged
Unclogging refrigerator drain is one of the most common appliance problems homeowners face. Water pools inside your fridge. Food spoils faster.
Here's what happens: your refrigerator runs a defrost cycle every few hours. This melts frost from the evaporator coil.
The good news is that unclogging a refrigerator drain is usually a DIY job. You don't need expensive tools or professional help for most clogs.
Signs of a Clogged Fridge Drain
Water pooling on the bottom shelf is the clearest sign. You'll see it collecting under the crisper drawers or near the back wall.
Other warning signs include:
- Wet or soggy food, even items in sealed containers
- Frost buildup on the evaporator coil (visible if you remove the back panel)
- Musty or sour smells coming from inside the fridge
- Ice accumulation in the freezer section beyond normal frost
- Condensation dripping from shelves above onto food below
- Mold spots or discoloration inside the refrigerator
Don't ignore these signs. A backed-up drain line creates the perfect environment for bacterial growth. Your food spoils faster. Mold spreads quickly in the moisture. Addressing a clogged fridge drain early prevents bigger problems down the line.
Essential Tools for Unclogging Refrigerator Drain Lines
You have several options for clearing a blocked drain line. Some tools cost just a few dollars. Others are slightly pricier but offer more functionality. The best choice depends on the type of blockage you're dealing with.
Syringe or Baster Method
A large plastic syringe (100ml industrial grade) is one of the simplest and most effective tools.
This method works best for ice-based clogs. The warm water melts the ice while the pressure pushes it through.
The downside is that you need a tight seal against the drain hole for the syringe to work. Loose connections reduce pressure and limit effectiveness.
Flexible Brush and Pipe Cleaners
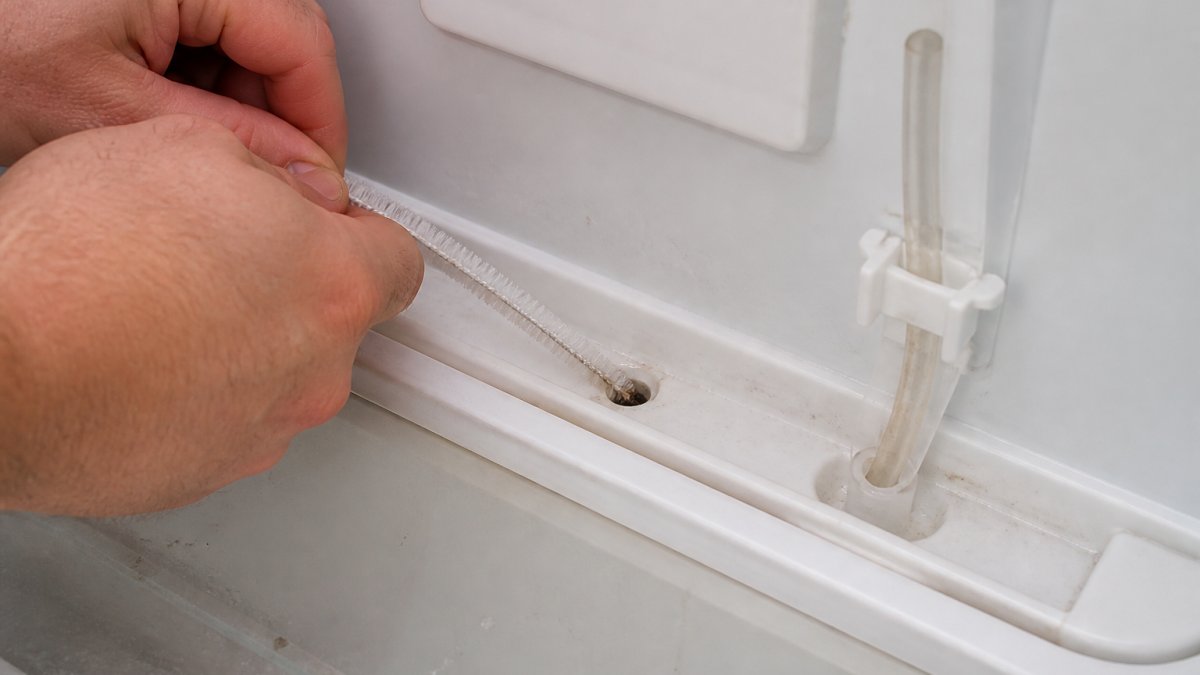
A long, thin flexible wire brush is designed to scrub the inside of drain tubes. Soft nylon bristles prevent scratching plastic drain lines.
Flexible brushes work well for organic buildup and slime. You can buy one for around $7.50.
Extra-thick pipe cleaners offer a gentler alternative. They're absorbent and flexible, making them ideal for light maintenance and absorbing standing water.
Weedeater Cord and Wire Probes
A weedeater trimmer line (the plastic cord used in string trimmers) works surprisingly well as a DIY drain snake. It's rigid enough to push through ice blockages but smooth enough not to damage plastic tubing.
This is the budget option, weedeater cord costs around $5. It excels at breaking through solid ice. The drawback is that it lacks a brush head for cleaning residue after the blockage clears.
Compressed Air Method
A pressurized air duster blows out loose debris and water from drain lines without physical contact. High-pressure output and an extension straw let you target the drain hole precisely.
Compressed air costs around $8 per canister. It's fast and efficient. However, it's messy if your clog is wet or sludge-based, the air just scatters wet debris instead of clearing it.
Refrigerator Drain Hole Cleaning Kit Options
If you want everything in one package, several manufacturers offer complete drain cleaning kits.
The General Electric (GE) Refrigerator Drain Cleaning Tool is a manufacturer-recommended option. It's a flexible probe designed specifically for GE refrigerator drain dimensions.
For basic needs, a simple plastic syringe paired with a flexible brush gives you the core tools without spending much. Total cost is under $15.
Step-by-Step Unclogging Procedure
Step 1: Locate the Drain Hole and Assess the Blockage
Find the drain hole first. It's typically a small opening (about the size of a pencil) located at the back of the refrigerator, near the bottom.
Once you locate it, look inside with a flashlight. Can you see ice? Is the hole completely blocked or partially open?
Step 2: Prepare Your Tools and Safety Equipment
Gather your chosen tools before you start. Have paper towels or a small towel ready, water will drip when you work on the drain.
If you're using warm water, heat it to lukewarm (not boiling). Boiling water can damage plastic drain lines.
Place a small bucket or tray under the drain hole to catch water and debris as it flows out.
Step 3: Clear Visible Debris
If you can see debris near the drain hole opening, remove it by hand or with tweezers. Pull out any visible food particles, dust, or ice chunks. This clears the path for your cleaning tool.
Don't force anything. If debris is stuck tight, move to the next step and let your tool do the work.
Step 4: Use Warm Water to Melt Ice Blockages
Fill your syringe with warm (not hot) water. Insert the syringe tip into the drain hole. Create a tight seal by pressing firmly.
Repeat this 3-5 times, refilling the syringe each time. The warm water melts ice blockages from the inside.
If you don't have a syringe, use a turkey baster or bulb syringe. The principle is the same: force warm water through the drain line with pressure.
Step 5: Insert and Work the Cleaning Tool
If the syringe alone doesn't clear the clog, insert your flexible brush or wire probe. Push it slowly into the drain hole.
Once it's in, work it back and forth gently. Twist the brush to scrub the inside walls.
For ice blockages, weedeater cord works well. Push it through with steady pressure. The rigid plastic breaks ice apart without damaging the drain line.
Step 6: Flush and Verify Drainage
After working with your mechanical tool, flush the line again with warm water. Use your syringe to push water through and wash out loosened debris.
Listen for the water flowing freely. You should hear a change in sound as the blockage clears, water will drain faster and more smoothly.
Once water flows freely, flush one more time with clean warm water to ensure the line is fully clear.
Refrigerator Drain Line Maintenance to Prevent Future Clogs
Once you've cleared your drain, prevent clogs from returning.
Pour warm water mixed with a little vinegar down the drain hole once a month.
Check your refrigerator's drain trough (the channel that leads to the drain hole) every few weeks.
Keep your refrigerator clean inside.
If you have a manual defrost refrigerator or a freezer, defrost it regularly according to the manual.
When to Call a Professional Technician
Some clogs are beyond DIY tools. If you've tried multiple methods and water still pools inside your refrigerator, it's time to call a professional.
Call a professional if:
- The clog is located deep inside the refrigerator chassis, beyond reach of standard tools
- The drain line is cracked or damaged (you can see liquid leaking from the line itself)
- Your refrigerator has a complex drain system with multiple lines or valves
- The blockage keeps returning within days or weeks
- You're uncomfortable working inside the appliance
Home Tech offers same-day and next-day appointments for refrigerator drain issues. Our EPA 608-certified technicians service all major brands including GE, Whirlpool, LG, Samsung, Bosch, Amana, Frigidaire, Jenn-Air, and Maytag.
A professional visit saves you from damaging the appliance. If your refrigerator is under warranty, attempting complex repairs yourself may void coverage.
Conclusion
Unclogging a refrigerator drain is usually a straightforward DIY task. A simple syringe, flexible brush, or weedeater cord clears most blockages in under an hour. Start with warm water and gentle pressure.
If DIY methods don't work or you're uncomfortable working inside the appliance, Home Tech is ready to help. Our same-day service means you won't lose food to spoilage while waiting for repairs.
Frequently Asked Questions
What are the best tools for unclogging a refrigerator drain line?
The most effective tools include a 100ml syringe for flushing with warm water, a flexible pipe cleaner or drain brush for mechanically dislodging debris, and a weedeater cord for breaking through ice blockages. A refrigerator drain hole cleaning kit combines multiple tools in one package. For minor clogs, warm water alone often works; for stubborn blockages, a combination approach using multiple tools yields the best results.
What are signs of a clogged fridge drain?
Water pooling on the refrigerator floor, condensation buildup inside the fridge, and water leakage from under the appliance are the primary indicators. You may also notice a musty smell from stagnant water or mold growth in the drain area. If your refrigerator isn't cooling properly, a blocked drain line affecting the evaporator coil's defrost cycle could be the culprit. Check the drain trough and plastic liner for standing water as a quick diagnostic step.
Is it safe to use chemical drain cleaners in a refrigerator?
No. Chemical drain cleaners are not food-safe and can damage refrigerator components, contaminate food storage areas, and harm the appliance's plastic tubing. Stick to mechanical tools and warm water flushing. If you must use any cleaning solution, use only food-safe options like a weak vinegar and water mixture, but mechanical clearing is always the safer choice for refrigerator drain line maintenance.
How often should I clean my refrigerator drain line to prevent clogs?
Most manufacturers recommend checking and flushing your drain line every 3 to 6 months as part of preventative maintenance. In humid climates or if you notice slower drainage, increase frequency to monthly. A simple warm water flush takes just a few minutes and can prevent costly water damage and food loss. Regular cleaning prevents debris and slime buildup that leads to ice blockages during the defrost cycle.


